Installing Mediatek Preloader USB VCOM Drivers on Windows 7,810 can be a tedious process due to their lack of digital signature. After Windows 8.1, Microsoft disabled this practice due to security measures so in this tutorial, I’ll guide you through the process to first disable Windows Driver Signature Verification and then properly install these drivers.
Table of Contents
Note: Driver Signature Verification is disabled only for the current boot, it will be enabled again if you reboot.

MediaTek USB VCOM Driver Free Download
Name: MT65xx_USB_VCOM_DRIVERS .zip
Size: 465 KB
Link: MediaFire
Readme: Miracle Box All Drivers 2024 Free Download For Windows (32 Bit & 64 Bit)
Install MTK USB VCOM Drivers
- Firstly download the MTK USB VCOM Driver from any of links below and extract them to a suitable location.
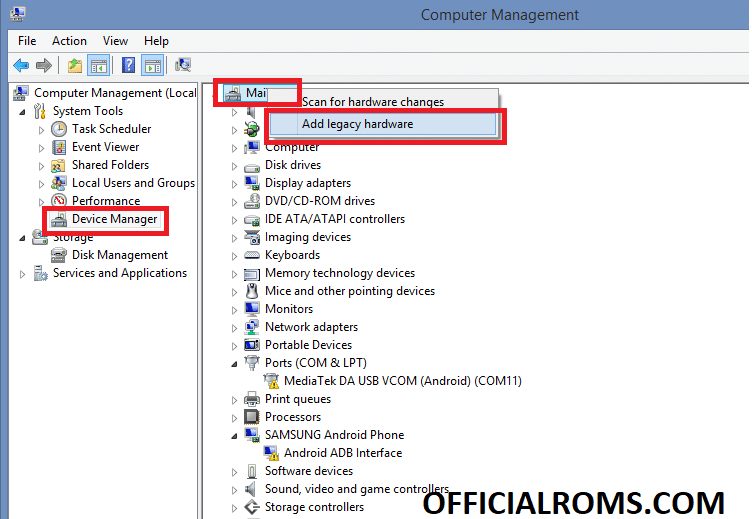
- Open Device Manager by right-clicking on the start button and select Device Manager or by searching Device Manager in the Cortana search.
- In the Device Manager Windows right click on your username and select Add Legacy hardware.

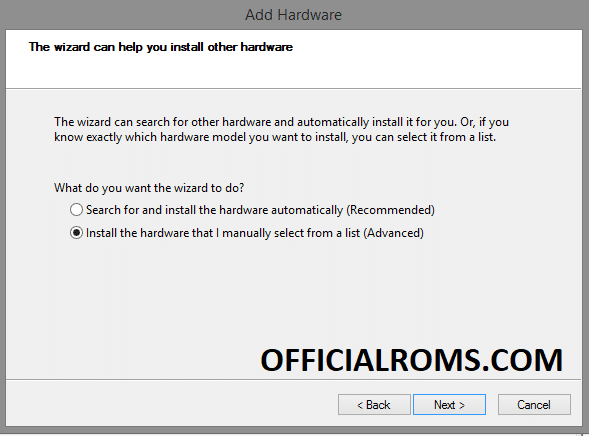
- Add Hardware wizard will popup just click on the Next button to proceed.
- In the next step select second option saying “Install the hardware that I manually select from a list (Advanced)” and click on Next button.

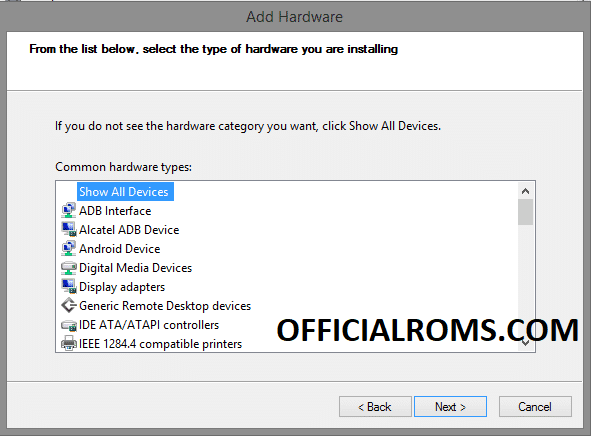
- Next you will see a long list of Hardware Types. Just select Show All Devices and click Next.

- Click on Have Disk in the next windows and select .inf file according to PC environment that you extracted in Click on Start Button and click on Settings App or you can also do it by searching Settings in the Cortana Search.
- Once selected, click on Next button. You will get a Windows Security Warning asking to install unsigned drivers, just click on Install Anyway.
That’s it, Your MTK drivers are successfully installed. Restart your system and connect your MediaTek MTK device, now you can your flash tools to start flashing custom ROMS and Firmware.
Disable Windows Driver Signature Verification
- Click on Start Button and click on Settings App or you can also do it by searching Settings in the Cortana Search.
- In the Settings Window click on Update and Security and then on Recovery Option from the left sidebar.
- You will find Advanced Start-up in Recovery Windows, just click on the restart now button below that.
- After rebooting, pick Troubleshoot and Advanced Options in the resume box.
- From the Advanced Options menu select Start-up Settings and click on the Restart button.
- After your system reboots you will see Star-up settings asking for the options, click on number 7 key on your keyboard to select Disable Driver Signature Enforcement.
- That’s it, Your system will reboot with disabled driver signature verification.
Read Also:
- Oppo Preloader Driver For All Oppo MTK 2024 Qualcomm CPU
- How to Pre-Download Overwatch 2’s Battle for Olympus mode?
- Just the Cheese Net Worth 2024: What after Shark Tank?
- Lava Z61 FRP Unlock File Using by Sptools With PC
- New Update Vivo USB Driver for All Devices Full Guide
If you face any problem while installing leave your querie the comments below.


